TM 1-1500-204-23-3
(1)
Repair hole damage, cuts, tears and
snags that penetrate one or more interior plies (fabric
damage) as follows:
(a) Use knife and trim away loose,
damaged or blistered interior edges (figure 2-24).
(b) Clean damaged area using a dean
cloth (item 16, table 2-11) dampened with acetone (item
3, table 2-11). Wear gloves (item 4, table 2-11).
WARNING
Ensure all drills are non-sparking.
(c) Buff surface around damage (1,
figure 2-27) 2 1/4 inches larger in all directions than
damaged area. Use portable drill, abrasive arbor (2),
and/or scotch-brite. Buff only to remove gloss without
excessively reducing interior ply thickness.
(d) Clean buffed area. Use clean
cloths (item 16, table 2-11) dampened with acetone
(item 3, table 2-11). Wear gloves (item 4, table 2-11).
(e) Cut fabric reinforcing patch (1,
figure 2-28) from nylon fabric (item 7, table 2-11) large
enough to overlap damaged area (1) 2 inches in all
directions.
NOTE
Mix adhesive in accordance with
manufacturer's
instructions,
except do not mix full quantity of
Parts 2 and 3 with Part 1. The full
contents of Parts 2 and 3 can be
mixed together and then used as
necessary (mixed shelf life is 6
months). When mixing Parts 2
and 3 with Part 1, mix only
quantity needed to perform repair.
Mixing ratio is 58.24% of Parts 2
and 3 (mixed together) to 41.76%
of Part 1.
(f) Prepare repair adhesive (item 1,
table 2-11 ) by blending the ingredients of Part 2 and 3
together first and then transfer the mixture of Part 2 and
3 into the can of Part 1. Wear gloves (item 4, table 2-
11).
CAUTION
Unmixed adhesive will not cure.
(g) Stir adhesive mixture with tongue
depressor (item 5, table 2-11) for approximately 5
minutes. Make certain components are completely
blended together.
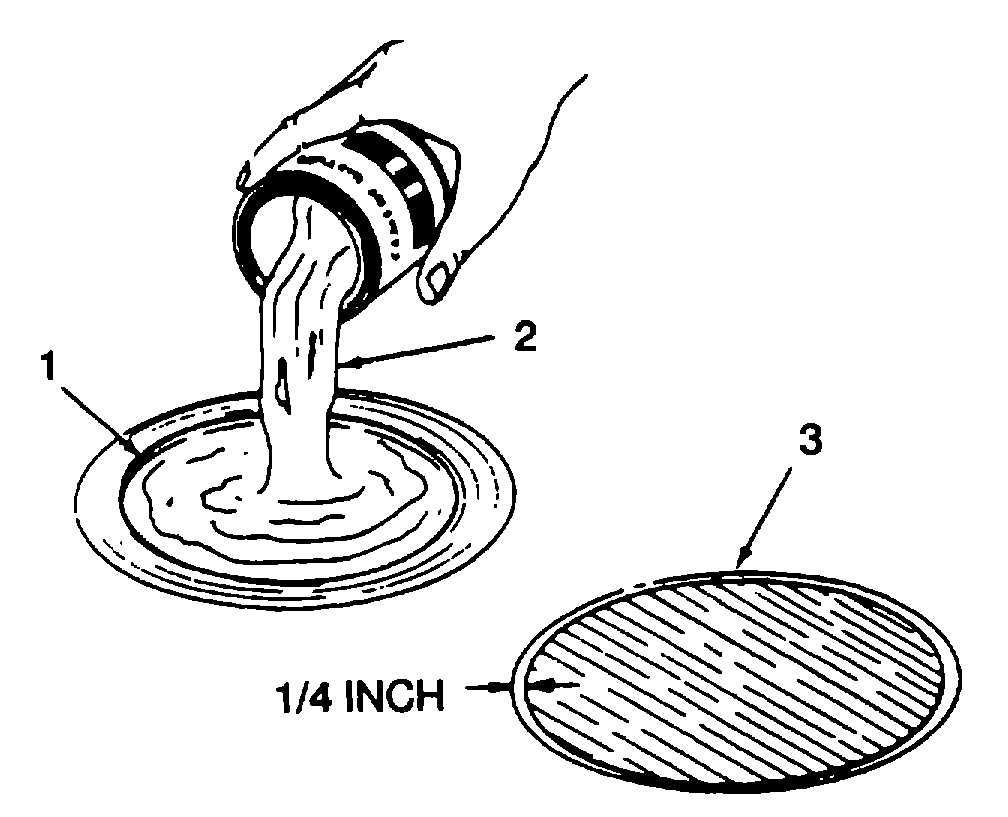
(h) Fill cavity of damaged area (1,
figure 2-33) level with inner liner with adhesive mixture
(2) to make a smooth continuous surface to apply
barrier over. Smooth surface with gloved fingers wet
with acetone (item 3, table 2-11). Remove any excess
adhesive from buffed area using a dean cloth (item 16,
table 2-11) dampened with acetone (item 3, table 2-11).
Apply adhesive mixture to no more than 1/4 inch of O.D.
of buffed area (3).
Figure 2-33. Filling Cavity with Adhesive Mixture
(i) Allow adhesive to air cure for
approximately 30 minutes.
CAUTION
Barrier adhesive is soluble in
acetone. Do not apply acetone to
repair area after applying barrier
cement.
CAUTION
Do not shake barrier adhesive.
Stir
with
a
wooden
tongue
depressor.
Change 2 2-51


