TM 1-1500-204-23-6
NOTE
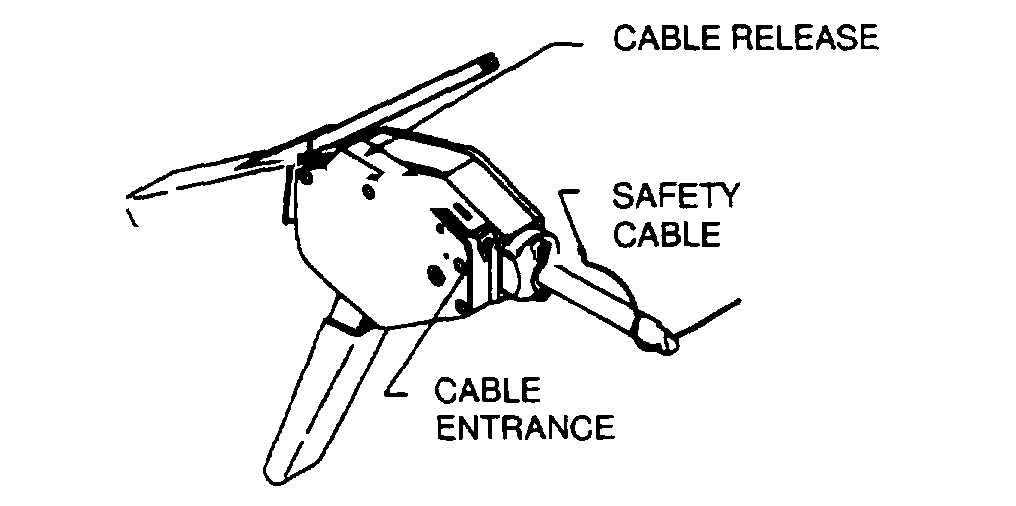
Do not release the free end of the cable
until it has been inserted through the
tool nose.)
(1)
Insert the free end of the cable through
the tool nose (see figure 2-96) and slide the tool along
the cable to the fastener being secured. See figure 2-
97.
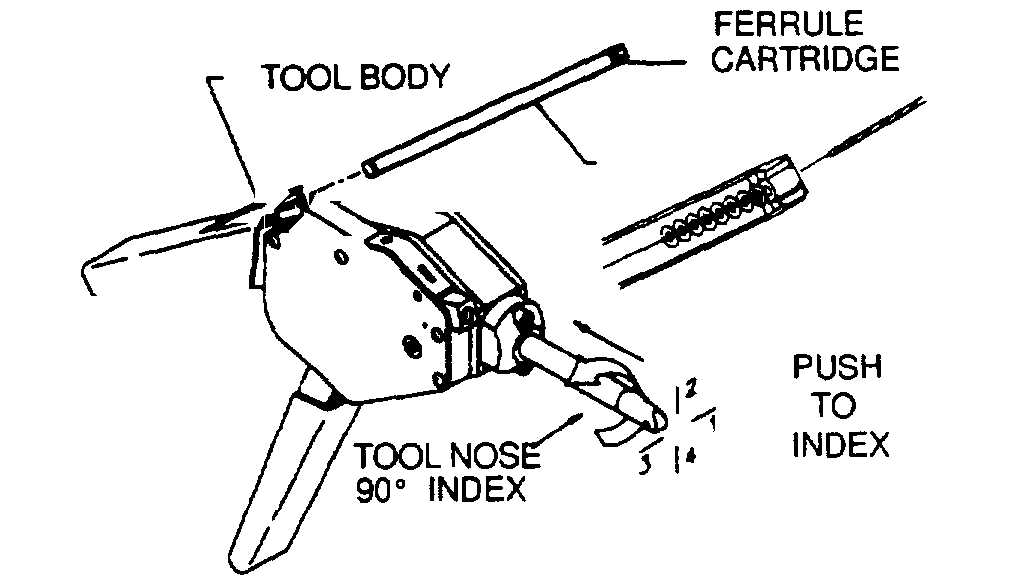
Figure 2-95. Pre-Set Tension Safety Cable Tool
Figure 2-96. Pre-Set Tension Safety cable Tool
2-21. Types of Safety Cable Tools.
a.
The Pre-Set Tension Tool. (See figures 2-95
and 2-96). Insert the free end of the cable into the cable
entrance and continue to push the cable into the cavity.
When the free end of the cable appears at the bottom of
the tool, grip the cable and pull the slack from the cable
until resistance is felt. Begin removing slack from the
cable by repeatedly closing the tool handle allowing the
handle to open fully before closing again. When all
slack is removed from the cable, snug the tool against
the fastener by using several short strokes of the
handle. Release the handle to the full open position and
fully close the handle to crimp securely and cut flush.
CAUTION
It is important on this final stroke to
hold
the
tool
as
steady
and
perpendicular
to
the
cable
as
possible while completing a full
stroke. This assures consistent
tensioning of the cable. See figure 2-
97.
Figure 2-97. Position of Safety Cable Too,
b.
Adjustable Tension Tool. (See figure 2-98).
Thread the safety cable through the fastener, ferrule,
and tool nose in the same way as with other models.
Wrap the cable one full revolution (clockwise) around
the tension wheel, and with slight pressure applied by
pulling the cable, secure the cable into the slot. Rotate
the tension knob until several clicks are heard and felt.
If additional tension is required, adjustment can be
made with the tension adjuster on the opposite side of
the tool.
CAUTION
Do not overtighten safety cable. It is
a good practice to find a tension
setting which removes the slack from
the cable, (in order to meet the flex
limit
requirement)
without
over
stressing
the
safety
cable
components.
(1)
Completely close the handle to crimp
and cut the cable. Hold the tool steady and
perpendicular to the cable to maintain consistent cable
tension. Release the handle and remove the tool from
the crimped ferrule. Remove the excess cable segment
from the tool prior to the next application.
(2)
If it is more convenient to use the
adjustable tension tool with the knob located on the
opposite side, remove the retaining ring located below
the tension adjuster, slide the knob assembly out of the
tool body, and re-insert it on the opposite side. Re-
install the retaining ring. See figure 2-98.
Change 2 2-89